目录
1.技术栈准备工作
2. 模块架构介绍
3.网关模块(gateway)
3.1 网关模块(gateway)
3.2 附上主要依赖包
3.3 bootstrap 相关配置
3.4 gateway.yaml
3.5 UserAuthGlobalFiter 全局拦截器配置
4.授权认证模块(auth)
4.1 启用web安全认证,通过继承 AuthorizationServerConfigurerAdapter
4.1.1 configure(AuthorizationServerSecurityConfigurer security) 方法
4.1.2 configure(ClientDetailsServiceConfigurer clients)方法
4.2 完整的授权服务配置代码(AuthTwoAuthorizationConfig)
4.3 安全配置类(SecurityConfig)
4.4 自定义 CustomUserDetailsService 类的实现
4.5 数据库配置类的实现(DataSourceConfig)
4.6 主要权限查询的方法的实现(MenuMapper.xml)
4.7 主要数据库脚本(auth.sql)
4.8 auth的bootstrap主要配置
4.9 auth-dev.yaml配置
5.安全服务模块(security-service)
5.1 ResourceServerConfig配置类
5.2附上主要依赖包
5.3 此公共模块的配置类的主要实现方式
5.4 其他模块暂时未完善,只写了一个controller接口,就不一一介绍了。
6.授权认证,以及权限控制实现的截图
Oauth2.0的介绍完毕
1.技术栈准备工作
1.1 SpringCloud alibaba 分布式微服务架构
1.2 Gateway 网关,微服务统一请求入口,配置了微服务的负载均衡。
1.3 Nacos 微服务注册中心,以及配置中心,主要管理各个微服务的配置,以及服务的注册。
1.4 Oauth 2.0 主要用于服务的授权认证,以及访问权限的管理。
1.5 MybatisPlus 主要用于数据库的增删改查。
1.6 Redis 主要用于缓存登录信息token ,以及后续一些热点数据。
1.7 Mysql 关系型数据库,主要负责存储业务表相关的数据
2. 模块架构介绍
2.1 auth模块 授权认证模块,oauth2.0授权码的获取,以及密码模式的token令牌的生成,都可以通过该模块的接口请求得到
2.2 common模块,公共类模块,一些组件,以及一些公共类都存放于此模块中。
2.3 consumer 模块 主要用于消费mq产生的消息。
2.4 gateway模块 网关模块,所有的外部请求的统一入口。
2.5 mq 消息的提供者,应对并发量比较大的场景。
2.6 security-service 安全认证模块,由于每个模块都需要,所以集成了一个公用的服务。
2.7 system 系统级别的模块。
3.网关模块(gateway)
3.1 网关模块(gateway)
这是所有外部请求的统一入口,也就是前端跨域请求,发起http请求的时候,必须先通过此接口。
3.2 附上主要依赖包
<?xml version="1.0" encoding="UTF-8"?>
<project xmlns="http://maven.apache.org/POM/4.0.0" xmlns:xsi="http://www.w3.org/2001/XMLSchema-instance"
         xsi:schemaLocation="http://maven.apache.org/POM/4.0.0 https://maven.apache.org/xsd/maven-4.0.0.xsd">
    <modelVersion>4.0.0</modelVersion>
    <parent>
        <groupId>org.springframework.boot</groupId>
        <artifactId>spring-boot-starter-parent</artifactId>
        <version>2.3.2.RELEASE</version>
     <!-- lookup parent from repository -->
    </parent>
    <groupId>com.example</groupId>
    <artifactId>gateway</artifactId>
    <version>0.0.1-SNAPSHOT</version>
    <name>gateway</name>
    <description>Demo project for Spring Boot</description>
    <url/>
    <licenses>
        <license/>
    </licenses>
    <developers>
        <developer/>
    </developers>
    <scm>
        <connection/>
        <developerConnection/>
        <tag/>
        <url/>
    </scm>
    <properties>
        <java.version>8</java.version>
    </properties>
    <dependencies>
        <dependency>
            <groupId>com.example</groupId>
            <artifactId>common</artifactId>
            <version>0.0.1-SNAPSHOT</version>
            <exclusions>
                <exclusion>
                    <groupId>org.springframework.boot</groupId>
                    <artifactId>spring-boot-starter-web</artifactId>
                </exclusion>
            </exclusions>
        </dependency>
        <dependency>
            <groupId>org.springframework.boot</groupId>
            <artifactId>spring-boot-starter-data-redis</artifactId>
        </dependency>

        <dependency>
            <groupId>io.jsonwebtoken</groupId>
            <artifactId>jjwt</artifactId>
            <version>0.9.1</version> <!-- 请检查是否有更新的版本 -->
        </dependency>

        <!--网关核心依赖-->
        <dependency>
            <groupId>org.springframework.cloud</groupId>
            <artifactId>spring-cloud-starter-gateway</artifactId>
            <version>2.2.10.RELEASE</version>
            <exclusions>
                <exclusion>
                    <groupId>io.projectreactor.netty</groupId>
                    <artifactId>reactor-netty</artifactId>
                </exclusion>
            </exclusions>
        </dependency>
        <!--版本冲突报错指定reactor-netty、spring-webflux版本-->
        <dependency>
            <groupId>org.springframework</groupId>
            <artifactId>spring-webflux</artifactId>
            <version>5.2.7.RELEASE</version>
        </dependency>
        <dependency>
            <groupId>io.projectreactor.netty</groupId>
            <artifactId>reactor-netty</artifactId>
            <version>0.9.14.RELEASE</version>
        </dependency>

        <dependency>
            <groupId>org.springframework.boot</groupId>
            <artifactId>spring-boot-starter</artifactId>
        </dependency>

        <dependency>
            <groupId>org.springframework.boot</groupId>
            <artifactId>spring-boot-starter-test</artifactId>
            <scope>test</scope>
        </dependency>

        <dependency>
            <groupId>org.projectlombok</groupId>
            <artifactId>lombok</artifactId>
        </dependency>

    </dependencies>

    <build>
        <plugins>
            <plugin>
                <groupId>org.springframework.boot</groupId>
                <artifactId>spring-boot-maven-plugin</artifactId>
            </plugin>
        </plugins>
    </build>

</project>
3.3 bootstrap 相关配置
因为我把所有的配置都丢到了nacos,nacos管理了所有服务的配置,主要是nacos的自动更新配置的功能比较方便,即修改配置之后,可以实现自动刷新,无需重启服务,但需要在使用配置类中添加@RefreshScope注解才生效。
server:
  port: 8063
spring:
  main:
    web-application-type: reactive
    allow-bean-definition-overriding: true
  application:
    name: gateway
  profiles:
    active:
      dev
  cloud:
    nacos:
      config:
        file-extension: yaml
        #启用配置热更新功能
        refresh-enabled: true
        prefix: gateway
      server-addr: 192.168.1.24:8849
      discovery:
        instance-enabled: true
        server-addr: 192.168.1.24:8849
        cluster-name: gateway
        service: gateway-service
3.4 gateway.yaml
主要包含了一些mysql数据库的连接配置,redis连接配置,以及路由转发和白名单路径。
spring:
  datasource:
        driver-class-name: com.mysql.cj.jdbc.Driver
        url: jdbc:mysql://localhost:3306/gateway?serverTimezone=Asia/Shanghai&useUnicode=true&characterEncoding=utf-8&allowMultiQueries=true&nullCatalogMeansCurrent=true
        username: root
        password: ******
        type: com.alibaba.druid.pool.DruidDataSource
        druid:
            initial-size: 5
            min-idle: 1
            max-active: 10
            max-wait: 60000
            validation-query: SELECT 1 FROM DUAL
            test-on-borrow: false
            test-on-return: false
            test-while-idle: true
            time-between-eviction-runs-millis: 60000
  redis:
    port: 6379
  cloud:
    gateway:
      globalcors: # 全局的跨域配置
      # 解决options请求被拦截问题
        add-to-simple-url-handler-mapping: true
               # options请求 就是一种询问服务器是否浏览器可以跨域的请求
               # 如果每次跨域都有询问服务器是否浏览器可以跨域对性能也是损耗
               # 可以配置本次跨域检测的有效期maxAge
               # 在maxAge设置的时间范围内,不去询问,统统允许跨域
        corsConfigurations:
          '[/**]':
            allowedOrigins:   # 允许哪些网站的跨域请求
              - "http://localhost:8061"
            allowedMethods:   # 允许的跨域ajax的请求方式
              - "GET"
              - "POST"
              - "DELETE"
              - "PUT"
              - "OPTIONS"
            allowedHeaders: "*"  # 允许在请求中携带的头信息
            allowCredentials: true # 允许在请求中携带cookie
            maxAge: 360000    # 本次跨域检测的有效期(单位毫秒)
      discovery:
        locator:
          enabled: true
      routes:
         #路由微服务名称,
        - id: auth-service
        #路由目标微服务 lb代表负载均衡协议
          uri: lb://auth-service
          #以请求路径做判断,只要符合匹配规则的请求就会被转发到上面信息对应的微服务中去  #路由断言,判断是否符合规则,符合规则路由到目标
          predicates:
            - Path=/auth/**,/search/**,/oauth/authorize/**,/oauth/token/**

        - id: consumer-service
          uri: lb://consumer-service
          predicates:
            - Path=/consumer/**
        - id: system-service
          uri: lb://system-service
          predicates:
            - Path=/system/**,/addresses/**
        - id: mq-service
          uri: lb://mq-service
          predicates:
            - Path=/mq/**
          #filters:                       # 过滤器,请求在传递过程中可以通过过滤器对其进行一定的修改# 转发之前去掉1层路径
           # - StripPrefix=1
      default-filters:            #默认过滤器,对请求进行处理
      #在请求头中添加信息,前键后值。
        - AddRequestHeader=headerName, project is well


# 安全配置
security:
  # 不校验白名单
  ignore:
    urls:
    #不校验登录
      - /login
      #不校验授权码认证
      - /oauth/authorize
      #不校验token获取
      - /oauth/token
3.5 UserAuthGlobalFiter 全局拦截器配置
通过实现 GlobalFilter, Ordered 接口,对进来的请求进行拦截,主要拦截 Authorization,拦截完之后,校验是否为空,不为空,就通过路由转发到相应的服务。
package com.example.gateway.filter;

import com.alibaba.cloud.commons.lang.StringUtils;
import com.alibaba.fastjson.JSON;
import com.alibaba.fastjson.JSONObject;
import com.example.gateway.config.UrlsProperties;
import com.example.gateway.utils.JWTUtil;
import org.slf4j.Logger;
import org.slf4j.LoggerFactory;
import org.springframework.beans.factory.annotation.Autowired;
import org.springframework.cloud.context.config.annotation.RefreshScope;
import org.springframework.cloud.gateway.filter.GatewayFilterChain;
import org.springframework.cloud.gateway.filter.GlobalFilter;
import org.springframework.core.Ordered;
import org.springframework.core.io.buffer.DataBuffer;
import org.springframework.core.io.buffer.DataBufferFactory;
import org.springframework.http.HttpStatus;
import org.springframework.http.server.reactive.ServerHttpRequest;
import org.springframework.http.server.reactive.ServerHttpResponse;
import org.springframework.stereotype.Component;
import org.springframework.util.MultiValueMap;
import org.springframework.web.server.ServerWebExchange;
import reactor.core.publisher.Mono;

import java.nio.charset.StandardCharsets;
import java.util.HashMap;
import java.util.List;
import java.util.Map;

/**
 * 全局拦截器
 */
@Component
@RefreshScope
public class UserAuthGlobalFiter   implements GlobalFilter, Ordered {
    private Logger logger = LoggerFactory.getLogger(UserAuthGlobalFiter.class);
    @Autowired
    private UrlsProperties urlsProperties;
    @Override
    public Mono<Void> filter(ServerWebExchange exchange, GatewayFilterChain chain) {
        ServerHttpRequest serverHttpRequest = exchange.getRequest();
        String path = serverHttpRequest.getURI().getPath();

        String token = serverHttpRequest.getHeaders().getFirst("Authorization");
        MultiValueMap<String, String> queryParams = exchange.getRequest().getQueryParams();
        //不需要认证的路径,直接放行
        List<String> urls = urlsProperties.getUrls();
        logger.info("path:{}",path);
        logger.info("urls:{}",urls);
        if (urls.contains(path)) {
            return chain.filter(exchange);
        }
        //开始认证
        String username = String.valueOf(serverHttpRequest.getQueryParams().get("username"));
        logger.info("请求username:{}",username);
        if(StringUtils.isBlank(token))
        {
            //写法1
            //设置状态码 未授权401
            //exchange.getResponse().setStatusCode(HttpStatus.UNAUTHORIZED);
            //个人理解,终止输出访问
            //return exchange.getResponse().setComplete();
            //写法2
            ServerHttpResponse response = exchange.getResponse();
            response.getHeaders().add("Content-Type","application/json;charset=UTF-8");
            response.setStatusCode(HttpStatus.FORBIDDEN);
            DataBufferFactory dataBufferFactory = response.bufferFactory();
            Map<String,Object> errorMsg = new HashMap<>();
            errorMsg.put("code",500);
            errorMsg.put("msg","无权限");
            String errorJSon  = JSON.toJSONString(errorMsg);
            DataBuffer dataBuffer = dataBufferFactory.wrap(errorJSon.getBytes(StandardCharsets.UTF_8));
            return response.writeWith(Mono.just(dataBuffer));
        }

        //继续往下执行
        return chain.filter(exchange);
    }

    @Override
    public int getOrder() {
        return 0;
    }

    /**
     * 判断是否可以访问
     * @param urls
     * @return
     */
  /* public boolean isVisist(ServerWebExchange exchange, GatewayFilterChain chain,List<String>urls){
        ServerHttpRequest serverHttpRequest = exchange.getRequest();
        //当前请求的路径
        String path = serverHttpRequest.getURI().getPath();
        //请求的路径存在与携带的路径中,那就允许访问
        if (null == urls || urls.size()<=0){
            return false;
        }
        //遍历,如果找到相同的路径就返回true
       for (String s:urls){
           if (s.equals(path)){
               return true;
           }
       }
       return false;
    }*/
}
4.授权认证模块(auth)
4.1 启用web安全认证,通过继承 AuthorizationServerConfigurerAdapter
类,重写两个重载的 configure 方法。
4.1.1 configure(AuthorizationServerSecurityConfigurer security) 方法
通过该方法分别开启/oauth/token_key ,/oauth/check_token,访问权限,开启支持 client_id 和 client_secret 登录认证。
  @Override
    public void configure(AuthorizationServerSecurityConfigurer security) throws Exception {
        security
                //开启/oauth/token_key验证端口权限访问
                .tokenKeyAccess("permitAll()")
                //开启/oauth/check_token验证端口认证权限访问
                .checkTokenAccess("permitAll()")
                //表示支持 client_id 和 client_secret 做登录认证
                .allowFormAuthenticationForClients();
    }
4.1.2 configure(ClientDetailsServiceConfigurer clients)方法
该方法主要制定客户端id和客户端秘钥secret,以及开启支持多种授权方式。
       //内存模式
        clients.inMemory()
                //客户端id
                .withClient("admin")
                //客户端秘钥
                .secret(new BCryptPasswordEncoder().encode("123456"))
                //资源id,唯一,比如订单服务作为一个资源,可以设置多个,如果不设置,其他服务就会报错
                .resourceIds("mq","consumer","auth","oauth2-resource")
                //授权模式,总共四种,1. authorization_code(授权码模式)、password(密码模式)、client_credentials(客户端模式)、implicit(简化模式)
                //refresh_token并不是授权模式,
                .authorizedGrantTypes("authorization_code","password","client_credentials","implicit","refresh_token")
                //允许的授权范围,客户端的权限,这里的all只是一种标识,可以自定义,为了后续的资源服务进行权限控制
                .scopes("all")
                //false 则跳转到授权页面
                .autoApprove(false)
                //授权码模式的回调地址
                .redirectUris("http://www.baidu.com");
4.2 完整的授权服务配置代码(AuthTwoAuthorizationConfig)
package com.example.auth.config;

import org.springframework.beans.factory.annotation.Autowired;
import org.springframework.context.annotation.Bean;
import org.springframework.context.annotation.Configuration;
import org.springframework.http.HttpMethod;
import org.springframework.security.authentication.AuthenticationManager;
import org.springframework.security.crypto.bcrypt.BCryptPasswordEncoder;
import org.springframework.security.oauth2.config.annotation.configurers.ClientDetailsServiceConfigurer;
import org.springframework.security.oauth2.config.annotation.web.configuration.AuthorizationServerConfigurerAdapter;
import org.springframework.security.oauth2.config.annotation.web.configuration.EnableAuthorizationServer;
import org.springframework.security.oauth2.config.annotation.web.configurers.AuthorizationServerEndpointsConfigurer;
import org.springframework.security.oauth2.config.annotation.web.configurers.AuthorizationServerSecurityConfigurer;
import org.springframework.security.oauth2.provider.ClientDetailsService;
import org.springframework.security.oauth2.provider.code.AuthorizationCodeServices;
import org.springframework.security.oauth2.provider.code.InMemoryAuthorizationCodeServices;
import org.springframework.security.oauth2.provider.token.*;
import org.springframework.security.oauth2.provider.token.store.JwtAccessTokenConverter;

import java.util.Arrays;

/**
 * 授权服务配置
 */

@Configuration
@EnableAuthorizationServer
public class AuthTwoAuthorizationConfig  extends AuthorizationServerConfigurerAdapter {
    @Autowired
    private TokenStore tokenStore;
    /**
     * 客户端存储策略,这里使用内存方式,后续可以存储在数据库
     */
    @Autowired
    private ClientDetailsService clientDetailsService;

    /**
     * Security的认证管理器,密码模式需要用到
     */
    @Autowired
    private AuthenticationManager authenticationManager;

    @Autowired
    private JwtAccessTokenConverter jwtAccessTokenConverter;
    @Autowired
    private AddionInfo addionInfo;

    /**
     * 配置令牌访问的安全约束
     */
    @Override
    public void configure(AuthorizationServerSecurityConfigurer security) throws Exception {
        security
                //开启/oauth/token_key验证端口权限访问
                .tokenKeyAccess("permitAll()")
                //开启/oauth/check_token验证端口认证权限访问
                .checkTokenAccess("permitAll()")
                //表示支持 client_id 和 client_secret 做登录认证
                .allowFormAuthenticationForClients();
    }
    //配置客户端
    @Override
    public void configure(ClientDetailsServiceConfigurer clients) throws Exception {
        //内存模式
        clients.inMemory()
                //客户端id
                .withClient("admin")
                //客户端秘钥
                .secret(new BCryptPasswordEncoder().encode("123456"))
                //资源id,唯一,比如订单服务作为一个资源,可以设置多个,如果不设置,其他服务就会报错
                .resourceIds("mq","consumer","auth","oauth2-resource")
                //授权模式,总共四种,1. authorization_code(授权码模式)、password(密码模式)、client_credentials(客户端模式)、implicit(简化模式)
                //refresh_token并不是授权模式,
                .authorizedGrantTypes("authorization_code","password","client_credentials","implicit","refresh_token")
                //允许的授权范围,客户端的权限,这里的all只是一种标识,可以自定义,为了后续的资源服务进行权限控制
                .scopes("all")
                //false 则跳转到授权页面
                .autoApprove(false)
                //授权码模式的回调地址
                .redirectUris("http://www.baidu.com");
    }

    @Bean
    public AuthorizationServerTokenServices tokenServices() {
        DefaultTokenServices services = new DefaultTokenServices();
        //客户端端配置策略
        services.setClientDetailsService(clientDetailsService);
        //支持令牌的刷新
        services.setSupportRefreshToken(true);
        //令牌服务
        services.setTokenStore(tokenStore);
        //access_token的过期时间
        services.setAccessTokenValiditySeconds(30);
        //refresh_token的过期时间
        services.setRefreshTokenValiditySeconds(60 * 60 * 24 * 3);
        TokenEnhancerChain tokenEnhancerChain = new TokenEnhancerChain();
        tokenEnhancerChain.setTokenEnhancers(Arrays.asList(jwtAccessTokenConverter,addionInfo));
        //设置令牌增强,使用jwt
        services.setTokenEnhancer(tokenEnhancerChain);
        return services;
    }
    /**
     * 授权码模式的service,使用授权码模式authorization_code必须注入
     */
    @Bean
    public AuthorizationCodeServices authorizationCodeServices() {
        //授权码存在内存中
        return new InMemoryAuthorizationCodeServices();
    }

    /**
     * 配置令牌访问的端点
     */
    @Override
    public void configure(AuthorizationServerEndpointsConfigurer endpoints) throws Exception {
        endpoints
                //授权码模式所需要的authorizationCodeServices
                .authorizationCodeServices(authorizationCodeServices())
                //密码模式所需要的authenticationManager
                .authenticationManager(authenticationManager)
                //令牌管理服务,无论哪种模式都需要
                .tokenServices(tokenServices())
                //只允许POST提交访问令牌,uri:/oauth/token
                .allowedTokenEndpointRequestMethods(HttpMethod.POST);
    }

}
4.3 安全配置类(SecurityConfig)
重写一个配置方法和一个授权管理方法,配置方法主要实现了通过数据库校验账号密码。
package com.example.auth.config;

import com.example.auth.service.CustomUserDetailsService;
import org.springframework.beans.factory.annotation.Autowired;
import org.springframework.context.annotation.Bean;
import org.springframework.context.annotation.Configuration;
import org.springframework.security.authentication.AuthenticationManager;
import org.springframework.security.config.annotation.authentication.builders.AuthenticationManagerBuilder;
import org.springframework.security.config.annotation.web.builders.HttpSecurity;
import org.springframework.security.config.annotation.web.configuration.EnableWebSecurity;
import org.springframework.security.config.annotation.web.configuration.WebSecurityConfigurerAdapter;


@Configuration
@EnableWebSecurity
public class SecurityConfig  extends WebSecurityConfigurerAdapter {
    /**
     * 加密算法
     */

    @Autowired
    private CustomUserDetailsService userDetailsService;

    @Override
    protected void configure(AuthenticationManagerBuilder auth) throws Exception {
        //从数据库中查询用户信息
        auth.userDetailsService(userDetailsService);
    }

    @Override
    protected void configure(HttpSecurity http) throws Exception {
        //todo 允许表单登录
        http.authorizeRequests()
                .anyRequest().authenticated()
                .and()
                .formLogin()
                .loginProcessingUrl("/login")
                .permitAll()
                .and()
                .csrf()
                .disable();
    }

    /**
     * AuthenticationManager对象在OAuth2认证服务中要使用,提前放入IOC容器中
     * Oauth的密码模式需要
     */
    @Override
    @Bean
    public AuthenticationManager authenticationManagerBean() throws Exception {
        return super.authenticationManagerBean();
    }


}
4.4 自定义 CustomUserDetailsService 类的实现
校验用户名和密码是否正确,并且将查询出来的权限赋予用户,通过SpringSecurity的内部注解实现权限认证。
package com.example.auth.service;

import org.slf4j.Logger;
import org.slf4j.LoggerFactory;
import org.springframework.beans.factory.annotation.Autowired;
import org.springframework.security.core.GrantedAuthority;
import org.springframework.security.core.authority.SimpleGrantedAuthority;
import org.springframework.security.core.userdetails.User;
import org.springframework.security.core.userdetails.UserDetails;
import org.springframework.security.core.userdetails.UserDetailsService;
import org.springframework.security.core.userdetails.UsernameNotFoundException;
import org.springframework.security.crypto.bcrypt.BCryptPasswordEncoder;
import org.springframework.stereotype.Service;

import java.util.*;
import java.util.stream.Collectors;

@Service
public class CustomUserDetailsService  implements UserDetailsService {
    private Logger logger = LoggerFactory.getLogger(CustomUserDetailsService.class);
    @Autowired
    private  IUserService userService;
    @Autowired
    private IMenuService menuService;
    @Override
    public UserDetails loadUserByUsername(String username) throws UsernameNotFoundException {
        com.example.auth.entity.User  user = userService.findByUserName(username);
         Long uid =  user.getId();
         List<String> authes =menuService.findAuthoritiesByUid(uid);

        if (Objects.isNull(user)){
            throw new RuntimeException("用户名或密码错误");
        }else {
            Collection<GrantedAuthority> authorities = new ArrayList<>();
            // 向集合中添加SimpleGrantedAuthority实例
            // SimpleGrantedAuthority是GrantedAuthority的一个简单实现
            for (String s:authes){
                authorities.add(new SimpleGrantedAuthority(s));
            }
            logger.info("authorities:{}",authorities);

            return new User(username,new BCryptPasswordEncoder().encode(user.getPassword()), authorities);
        }

    }
}
4.5 数据库配置类的实现(DataSourceConfig)
通过扫描注入的方式,注入MybatisPlus。
package com.example.auth.config;

import com.baomidou.mybatisplus.extension.plugins.MybatisPlusInterceptor;
import com.baomidou.mybatisplus.extension.plugins.inner.OptimisticLockerInnerInterceptor;
import com.baomidou.mybatisplus.extension.plugins.inner.PaginationInnerInterceptor;
import com.baomidou.mybatisplus.extension.spring.MybatisSqlSessionFactoryBean;
import org.apache.ibatis.session.SqlSessionFactory;
import org.mybatis.spring.annotation.MapperScan;
import org.springframework.boot.context.properties.ConfigurationProperties;
import org.springframework.boot.jdbc.DataSourceBuilder;
import org.springframework.context.annotation.Bean;
import org.springframework.context.annotation.Configuration;
import org.springframework.core.io.support.PathMatchingResourcePatternResolver;

import javax.sql.DataSource;

/**
 * MybatisPlus配置类 数据库连接
 */
@Configuration
@MapperScan(basePackages = "com.example.auth.mapper")
public class DataSourceConfig {
    @ConfigurationProperties(prefix = "spring.datasource")
    @Bean
    public DataSource dataSource() {
        return DataSourceBuilder.create().build();
    }

    @Bean
    public MybatisPlusInterceptor mybatisPlusInterceptor() {
        MybatisPlusInterceptor interceptor = new MybatisPlusInterceptor();
        //分页插件
        interceptor.addInnerInterceptor(new PaginationInnerInterceptor());
        //注册乐观锁插件
        interceptor.addInnerInterceptor(new OptimisticLockerInnerInterceptor());
        return interceptor;
    }
    @Bean
    public SqlSessionFactory sqlSessionFactory(DataSource dataSource, MybatisPlusInterceptor interceptor) throws Exception {
        MybatisSqlSessionFactoryBean ssfb = new MybatisSqlSessionFactoryBean();
        ssfb.setDataSource(dataSource);
        ssfb.setPlugins(interceptor);
        //到哪里找xml文件
        ssfb.setMapperLocations(new PathMatchingResourcePatternResolver()
                .getResources("classpath:/mapper/*Mapper.xml"));
        return ssfb.getObject();
    }
}
4.6 主要权限查询的方法的实现(MenuMapper.xml)
<!DOCTYPE mapper PUBLIC "-//mybatis.org//DTD Mapper 3.0//EN"
        "http://mybatis.org/dtd/mybatis-3-mapper.dtd">
<mapper namespace="com.example.auth.mapper.MenuMapper">
    <select id="findPermissByUid" resultType="java.lang.String" parameterType="java.lang.Long">
        select distinct m.component
        from sys_user_role ur
                 left join sys_role r on ur.role_id = r.id
                 left join sys_role_menu rm on ur.role_id = rm.role_id
                 left join sys_menu m on m.id = rm.menu_id
        where user_id = #{uid}
          and r.status = 0
          and m.status = 0
    </select>


    <select id="findAuthoritiesByUid" resultType="java.lang.String" parameterType="java.lang.Long">
        select distinct m.perms
        from sys_user_role ur
                 left join sys_role r on ur.role_id = r.id
                 left join sys_role_menu rm on ur.role_id = rm.role_id
                 left join sys_menu m on m.id = rm.menu_id
        where user_id = #{uid}
          and r.status = 0
          and m.status = 0
    </select>


</mapper>
4.7 主要数据库脚本(auth.sql)
/*
 Navicat Premium Data Transfer

 Source Server         : localhost_3306
 Source Server Type    : MySQL
 Source Server Version : 80037
 Source Host           : localhost:3306
 Source Schema         : auth

 Target Server Type    : MySQL
 Target Server Version : 80037
 File Encoding         : 65001

 Date: 05/07/2024 10:19:24
*/

SET NAMES utf8mb4;
SET FOREIGN_KEY_CHECKS = 0;

-- ----------------------------
-- Table structure for sys_menu
-- ----------------------------
DROP TABLE IF EXISTS `sys_menu`;
CREATE TABLE `sys_menu`  (
  `id` bigint NOT NULL AUTO_INCREMENT,
  `menu_name` varchar(64) CHARACTER SET utf8mb4 COLLATE utf8mb4_0900_ai_ci NOT NULL DEFAULT 'NULL' COMMENT '菜单名',
  `path` varchar(200) CHARACTER SET utf8mb4 COLLATE utf8mb4_0900_ai_ci NULL DEFAULT NULL COMMENT '路由地址',
  `component` varchar(255) CHARACTER SET utf8mb4 COLLATE utf8mb4_0900_ai_ci NULL DEFAULT NULL COMMENT '组件路径',
  `visible` char(1) CHARACTER SET utf8mb4 COLLATE utf8mb4_0900_ai_ci NULL DEFAULT '0' COMMENT '菜单状态(0显示 1隐藏)',
  `status` char(1) CHARACTER SET utf8mb4 COLLATE utf8mb4_0900_ai_ci NULL DEFAULT '0' COMMENT '菜单状态(0正常 1停用)',
  `perms` varchar(100) CHARACTER SET utf8mb4 COLLATE utf8mb4_0900_ai_ci NULL DEFAULT NULL COMMENT '权限标识',
  `icon` varchar(100) CHARACTER SET utf8mb4 COLLATE utf8mb4_0900_ai_ci NULL DEFAULT '#' COMMENT '菜单图标',
  `create_by` bigint NULL DEFAULT NULL,
  `create_time` datetime(0) NULL DEFAULT NULL,
  `update_by` bigint NULL DEFAULT NULL,
  `update_time` datetime(0) NULL DEFAULT NULL,
  `del_flag` int NULL DEFAULT 0 COMMENT '是否删除(0未删除 1已删除)',
  `remark` varchar(500) CHARACTER SET utf8mb4 COLLATE utf8mb4_0900_ai_ci NULL DEFAULT NULL COMMENT '备注',
  PRIMARY KEY (`id`) USING BTREE
) ENGINE = InnoDB AUTO_INCREMENT = 3 CHARACTER SET = utf8mb4 COLLATE = utf8mb4_0900_ai_ci COMMENT = '菜单表' ROW_FORMAT = Dynamic;

-- ----------------------------
-- Records of sys_menu
-- ----------------------------
INSERT INTO `sys_menu` VALUES (1, '部门管理', 'dept', 'system/dept/index', '0', '0', 'system:dept:list', '#', NULL, NULL, NULL, NULL, 0, NULL);
INSERT INTO `sys_menu` VALUES (2, '测试', 'dept', 'system/test/index', '0', '0', 'system:test:list', '#', NULL, NULL, NULL, NULL, 0, NULL);

-- ----------------------------
-- Table structure for sys_role
-- ----------------------------
DROP TABLE IF EXISTS `sys_role`;
CREATE TABLE `sys_role`  (
  `id` bigint NOT NULL AUTO_INCREMENT,
  `name` varchar(128) CHARACTER SET utf8mb4 COLLATE utf8mb4_0900_ai_ci NULL DEFAULT NULL,
  `role_key` varchar(100) CHARACTER SET utf8mb4 COLLATE utf8mb4_0900_ai_ci NULL DEFAULT NULL COMMENT '角色权限字符串',
  `status` char(1) CHARACTER SET utf8mb4 COLLATE utf8mb4_0900_ai_ci NULL DEFAULT '0' COMMENT '角色状态(0正常 1停用)',
  `del_flag` int NULL DEFAULT 0 COMMENT 'del_flag',
  `create_by` bigint NULL DEFAULT NULL,
  `create_time` datetime(0) NULL DEFAULT NULL,
  `update_by` bigint NULL DEFAULT NULL,
  `update_time` datetime(0) NULL DEFAULT NULL,
  `remark` varchar(500) CHARACTER SET utf8mb4 COLLATE utf8mb4_0900_ai_ci NULL DEFAULT NULL COMMENT '备注',
  PRIMARY KEY (`id`) USING BTREE
) ENGINE = InnoDB AUTO_INCREMENT = 3 CHARACTER SET = utf8mb4 COLLATE = utf8mb4_0900_ai_ci COMMENT = '角色表' ROW_FORMAT = Dynamic;

-- ----------------------------
-- Records of sys_role
-- ----------------------------
INSERT INTO `sys_role` VALUES (1, 'CEO', 'ceo', '0', 0, NULL, NULL, NULL, NULL, NULL);
INSERT INTO `sys_role` VALUES (2, 'Coder', 'coder', '0', 0, NULL, NULL, NULL, NULL, NULL);

-- ----------------------------
-- Table structure for sys_role_menu
-- ----------------------------
DROP TABLE IF EXISTS `sys_role_menu`;
CREATE TABLE `sys_role_menu`  (
  `role_id` bigint NOT NULL AUTO_INCREMENT COMMENT '角色ID',
  `menu_id` bigint NOT NULL DEFAULT 0 COMMENT '菜单id',
  PRIMARY KEY (`role_id`, `menu_id`) USING BTREE
) ENGINE = InnoDB AUTO_INCREMENT = 2 CHARACTER SET = utf8mb4 COLLATE = utf8mb4_0900_ai_ci ROW_FORMAT = Dynamic;

-- ----------------------------
-- Records of sys_role_menu
-- ----------------------------
INSERT INTO `sys_role_menu` VALUES (1, 1);
INSERT INTO `sys_role_menu` VALUES (1, 2);

-- ----------------------------
-- Table structure for sys_user
-- ----------------------------
DROP TABLE IF EXISTS `sys_user`;
CREATE TABLE `sys_user`  (
  `id` bigint NOT NULL AUTO_INCREMENT COMMENT '主键',
  `user_name` varchar(64) CHARACTER SET utf8mb4 COLLATE utf8mb4_0900_ai_ci NOT NULL DEFAULT 'NULL' COMMENT '用户名',
  `nick_name` varchar(64) CHARACTER SET utf8mb4 COLLATE utf8mb4_0900_ai_ci NOT NULL DEFAULT 'NULL' COMMENT '昵称',
  `password` varchar(64) CHARACTER SET utf8mb4 COLLATE utf8mb4_0900_ai_ci NOT NULL DEFAULT 'NULL' COMMENT '密码',
  `status` char(1) CHARACTER SET utf8mb4 COLLATE utf8mb4_0900_ai_ci NULL DEFAULT '0' COMMENT '账号状态(0正常 1停用)',
  `email` varchar(64) CHARACTER SET utf8mb4 COLLATE utf8mb4_0900_ai_ci NULL DEFAULT NULL COMMENT '邮箱',
  `phone` varchar(32) CHARACTER SET utf8mb4 COLLATE utf8mb4_0900_ai_ci NULL DEFAULT NULL COMMENT '手机号',
  `sex` char(1) CHARACTER SET utf8mb4 COLLATE utf8mb4_0900_ai_ci NULL DEFAULT NULL COMMENT '用户性别(0男,1女,2未知)',
  `avatar` varchar(128) CHARACTER SET utf8mb4 COLLATE utf8mb4_0900_ai_ci NULL DEFAULT NULL COMMENT '头像',
  `user_type` char(1) CHARACTER SET utf8mb4 COLLATE utf8mb4_0900_ai_ci NOT NULL DEFAULT '1' COMMENT '用户类型(0管理员,1普通用户)',
  `create_by` bigint NULL DEFAULT NULL COMMENT '创建人的用户id',
  `create_time` datetime(0) NULL DEFAULT NULL COMMENT '创建时间',
  `update_by` bigint NULL DEFAULT NULL COMMENT '更新人',
  `update_time` datetime(0) NULL DEFAULT NULL COMMENT '更新时间',
  `del_flag` int NULL DEFAULT 0 COMMENT '删除标志(0代表未删除,1代表已删除)',
  PRIMARY KEY (`id`) USING BTREE
) ENGINE = InnoDB AUTO_INCREMENT = 5 CHARACTER SET = utf8mb4 COLLATE = utf8mb4_0900_ai_ci COMMENT = '用户表' ROW_FORMAT = Dynamic;

-- ----------------------------
-- Records of sys_user
-- ----------------------------
INSERT INTO `sys_user` VALUES (1, 'zhangsan', '普通用户', '123456', '0', NULL, NULL, NULL, NULL, '1', NULL, NULL, NULL, NULL, 0);
INSERT INTO `sys_user` VALUES (4, 'lisi', '普通用户', '123456', '0', NULL, NULL, NULL, NULL, '1', NULL, NULL, NULL, NULL, 0);

-- ----------------------------
-- Table structure for sys_user_role
-- ----------------------------
DROP TABLE IF EXISTS `sys_user_role`;
CREATE TABLE `sys_user_role`  (
  `user_id` bigint NOT NULL AUTO_INCREMENT COMMENT '用户id',
  `role_id` bigint NOT NULL DEFAULT 0 COMMENT '角色id',
  PRIMARY KEY (`user_id`, `role_id`) USING BTREE
) ENGINE = InnoDB AUTO_INCREMENT = 2 CHARACTER SET = utf8mb4 COLLATE = utf8mb4_0900_ai_ci ROW_FORMAT = Dynamic;

-- ----------------------------
-- Records of sys_user_role
-- ----------------------------
INSERT INTO `sys_user_role` VALUES (1, 1);

SET FOREIGN_KEY_CHECKS = 1;
4.8 auth的bootstrap主要配置
server:
  port: 8061
spring:
  application:
    name: auth
  profiles:
    active:
      dev
  cloud:
    nacos:
      config:
        file-extension: yaml
        #启用配置热更新功能
        refresh-enabled: true
        prefix: auth
      server-addr: 192.168.1.24:8849
      discovery:
        instance-enabled: true
        server-addr: 192.168.1.24:8849
        cluster-name: auth
        service: auth-service
  redis:
    port: 6379
4.9 auth-dev.yaml配置
spring:
    datasource:
        driver-class-name: com.mysql.cj.jdbc.Driver
        jdbc-url: jdbc:mysql://localhost:3306/auth?serverTimezone=Asia/Shanghai&useUnicode=true&characterEncoding=utf-8&allowMultiQueries=true&nullCatalogMeansCurrent=true
        username: root
        password: Root@123
        type: com.alibaba.druid.pool.DruidDataSource
        druid:
            initial-size: 5
            min-idle: 1
            max-active: 10
            max-wait: 60000
            validation-query: SELECT 1 FROM DUAL
            test-on-borrow: false
            test-on-return: false
            test-while-idle: true
            time-between-eviction-runs-millis: 60000
    redis:
        port: 6379
mysql:
 driver: com.mysql.jdbc.driver
5.安全服务模块(security-service)
该模块主要用于其他服务模块提供安全认证。
5.1 ResourceServerConfig配置类
通过继承 ResourceServerConfigurerAdapter 实现token令牌的拦截,此外,还需要配置token的生成方法,即TokenConfig配置类。
ResourceServerConfig 配置类
package com.example.securityservice.config;

import org.springframework.beans.factory.annotation.Autowired;
import org.springframework.context.annotation.Configuration;
import org.springframework.security.config.annotation.web.builders.HttpSecurity;
import org.springframework.security.oauth2.config.annotation.web.configuration.EnableResourceServer;
import org.springframework.security.oauth2.config.annotation.web.configuration.ResourceServerConfigurerAdapter;
import org.springframework.security.oauth2.config.annotation.web.configurers.ResourceServerSecurityConfigurer;
import org.springframework.security.oauth2.provider.token.TokenStore;

@Configuration
@EnableResourceServer
public class ResourceServerConfig extends ResourceServerConfigurerAdapter {
    @Autowired
    TokenStore tokenStore;
    @Override
    public void configure(ResourceServerSecurityConfigurer resources) throws Exception {
        resources.tokenStore(tokenStore);
    }
    /**
     * 最后配置一下资源的拦截规则,这就是 Spring Security 中的基本写法,我就不再赘述。
     */
    @Override
    public void configure(HttpSecurity http) throws Exception {
        http.requestMatchers()
                .antMatchers("/**")
                .and()
                .authorizeRequests()
                .antMatchers("/**")
                .authenticated();
    }


}
TokenConfig配置类
package com.example.securityservice.config;

import org.springframework.context.annotation.Bean;
import org.springframework.context.annotation.Configuration;
import org.springframework.security.oauth2.provider.token.TokenStore;
import org.springframework.security.oauth2.provider.token.store.JwtAccessTokenConverter;
import org.springframework.security.oauth2.provider.token.store.JwtTokenStore;

/**
 * token配置
 */
@Configuration
public class TokenConfig {
    //签名
    private static String sign ="oauth";
    @Bean
    TokenStore tokenStore() {
        return new JwtTokenStore(jwtAccessTokenConverter());
    }
    @Bean
    JwtAccessTokenConverter jwtAccessTokenConverter() {
        JwtAccessTokenConverter converter = new JwtAccessTokenConverter();
        converter.setSigningKey(sign);
        return converter;
    }
}
5.2附上主要依赖包
<?xml version="1.0" encoding="UTF-8"?>
<project xmlns="http://maven.apache.org/POM/4.0.0" xmlns:xsi="http://www.w3.org/2001/XMLSchema-instance"
         xsi:schemaLocation="http://maven.apache.org/POM/4.0.0 https://maven.apache.org/xsd/maven-4.0.0.xsd">
    <modelVersion>4.0.0</modelVersion>
    <parent>
        <groupId>org.springframework.boot</groupId>
        <artifactId>spring-boot-starter-parent</artifactId>
        <version>2.3.2.RELEASE</version>
        <!-- lookup parent from repository -->
    </parent>
    <groupId>com.example</groupId>
    <artifactId>security-service</artifactId>
    <version>0.0.1-SNAPSHOT</version>
    <name>security-service</name>
    <description>security服务</description>
    <url/>
    <licenses>
        <license/>
    </licenses>
    <developers>
        <developer/>
    </developers>
    <scm>
        <connection/>
        <developerConnection/>
        <tag/>
        <url/>
    </scm>
    <properties>
        <java.version>8</java.version>
    </properties>
    <dependencies>
        <dependency>
            <groupId>org.springframework.cloud</groupId>
            <artifactId>spring-cloud-starter-oauth2</artifactId>
            <version>2.2.5.RELEASE</version>
        </dependency>


       <!-- <dependency>
            <groupId>org.springframework.boot</groupId>
            <artifactId>spring-boot-starter-security</artifactId>
            <version>2.3.2.RELEASE</version>
        </dependency>-->


        <!-- Spring Security OAuth 2.0 Resource Server -->
    <!--    <dependency>
            <groupId>org.springframework.security</groupId>
            <artifactId>spring-security-oauth2-resource-server</artifactId>
            <version>5.2.1.RELEASE</version>
        </dependency>-->

        <!-- Spring Security OAuth 2.0 JOSE (用于JWT) -->
        <dependency>
            <groupId>org.springframework.security</groupId>
            <artifactId>spring-security-oauth2-jose</artifactId>
            <version>5.0.1.RELEASE</version>
        </dependency>

        <dependency>
            <groupId>com.example</groupId>
            <artifactId>common</artifactId>
            <version>0.0.1-SNAPSHOT</version>
        </dependency>
        <dependency>
            <groupId>org.springframework.boot</groupId>
            <artifactId>spring-boot-starter</artifactId>
        </dependency>

        <dependency>
            <groupId>org.springframework.boot</groupId>
            <artifactId>spring-boot-starter-test</artifactId>
            <scope>test</scope>
        </dependency>
    </dependencies>

    <build>
        <plugins>
            <plugin>
                <groupId>org.springframework.boot</groupId>
                <artifactId>spring-boot-maven-plugin</artifactId>
            </plugin>
        </plugins>
    </build>

</project>
5.3 此公共模块的配置类的主要实现方式
通过扫描包的方式自动注入到配置类中,即可实现授权认证,大大降低了代码的耦合度。
package com.example.consumer.config;

import com.example.securityservice.config.ResourceServerConfig;
import com.example.securityservice.config.TokenConfig;
import org.springframework.beans.factory.annotation.Autowired;
import org.springframework.context.annotation.ComponentScan;
import org.springframework.context.annotation.Configuration;

/**
 * 通过扫描包的方式注入注解,降低代码的耦合度
 */
@ComponentScan(basePackages = "com.example.securityservice.config")
@Configuration
public class LoadAuthorizationConfig {
    @Autowired
    private TokenConfig tokenConfig;
    @Autowired
    private ResourceServerConfig resourceServerConfig;
}
5.4 其他模块暂时未完善,只写了一个controller接口,就不一一介绍了。
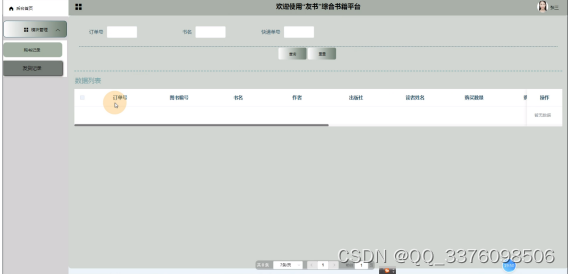
6.授权认证,以及权限控制实现的截图


Oauth2.0的介绍完毕
感悟:路虽远,行则将至。